กะว่าจะเขียนตั้งแต่สัปดาห์ที่แล้วล่ะ แต่คือสัปดาห์ที่แล้วเป็นช่วง Transition ใหญ่จาก Windows ไป macOS เลยไม่ได้เขียนอะไรเลยสัปดาห์ที่แล้วก็ขอโทษด้วยฮะ มากลับเข้าเรื่องกันดีกว่า
ในโลกของเว็บไซต์เนี่ย เรื่องความสวยงาม ง่ายต่อการใช้งาน แต่ที่สำคัญกว่านั่นก็คือความเร็วในการโหลด และความ Mobile-friendly
ถึงแม้ว่าเว็บของเราจะ Mobile-friendly และโทรศัพท์รุ่น Flagship ในมือเราจะโหลดเว็บของเราได้ไวระดับ 4 วินาทีก็ตาม แต่เราก็ต้องคำนึงถึงโทรศัพท์รุ่นเก่าๆ ที่มี Performance ต่ำ หรือโทรศัพท์ที่เปิดเว็บผ่านสัญญาณ 3G ด้วย ซึ่งถ้าคิดถึง Worst case เว็บอาจจะใช้เวลาโหลดถึง 12 วินาที เลยก็เป็นได้
เห็นคำว่า 12 วินาทีนี่ดูเบาๆ นะ แต่มันสามารถลดจำนวน User ที่วิ่งเข้ามาในเว็บได้เยอะมากๆ เลยดังนั้นเราจะต้องทำให้เว็บของเรานั้นเบาที่สุดเพื่อให้เว็บของเรานั้นโหลดได้ไว และต้องปรับ Performance เพื่อให้เว็บของเรา Render ได้เร็วขึ้นเช่นกัน
นั้นก็เป็นเหตุผลที่ AMP เข้ามา AMP (Accelerated Mobile Page)...
สร้างหน้า AMP HTML ขึ้นมา
เราก็จะเริ่มต้นง่ายๆ ด้วย Boilerplate ของ AMP HTML
<!DOCTYPE html>
<html amp lang="en">
<head>
  <meta charset="utf-8">
  <script async src="https://cdn.ampproject.org/v0.js"></script>
  <title>AMPHTML</title>
  <link rel="canonical" href="https://amp.rayriffy.com">
  <meta name="viewport" content="width=device-width, initial-scale=1.0">
  <style amp-boilerplate>body{-webkit-animation:-amp-start 8s steps(1,end) 0s 1 normal both;-moz-animation:-amp-start 8s steps(1,end) 0s 1 normal both;-ms-animation:-amp-start 8s steps(1,end) 0s 1 normal both;animation:-amp-start 8s steps(1,end) 0s 1 normal both}@-webkit-keyframes -amp-start{from{visibility:hidden}to{visibility:visible}}@-moz-keyframes -amp-start{from{visibility:hidden}to{visibility:visible}}@-ms-keyframes -amp-start{from{visibility:hidden}to{visibility:visible}}@-o-keyframes -amp-start{from{visibility:hidden}to{visibility:visible}}@keyframes -amp-start{from{visibility:hidden}to{visibility:visible}}</style><noscript><style amp-boilerplate>body{-webkit-animation:none;-moz-animation:none;-ms-animation:none;animation:none}</style></noscript>
</head>
<body>
  This is your first AMP page
</body>
</html>
ก็ก็อปวางตรงๆ ไปเลยโดยการที่จะเป็น AMP Page ได้จะต้องมี requirement ตามนี้เลย
| เงื่อนไข | เหตุผล? |
|---|---|
เริ่มต้นด้วย <!DOCTYPE html> |
อันนี้เป็น Standard อยู่แล้ว |
HTML tag แรกคือ <html amp> |
เพื่อบอกว่าหน้านี้เป็น AMP Page |
มี Tag <head> และ <body> |
Optional สำหรับ HTML แต่สำหรับ AMP ถือว่าสำคัญมากๆ |
ใน <head> เริ่มด้วย <meta charset="utf-8"> |
เพื่อไว้บอกประเภท Encoding ของหน้านี้ |
มี <script async src="https://cdn.ampproject.org/v0.js"></script> ใน Tag <head> |
เป็น Script เอาไว้ Intitialize AMPJS ถ้าหากใส่ JS อื่นเข้าไปใน <head> แนะนำว่าให้เอา Script นี้ไว้แรกสุดเลย |
มี <link rel="canonical" href="URL"> ใน <head> |
ใส่ URL ใน canonical เพื่อชี้ไปยังหน้า HTML ปกติ ถ้าไม่มีก็ชี้ใส่ตัวมันเองไปเลย |
ใส่ <meta name="viewport"> ใน <head> ด้วย |
เพื่อความ Responsive แนะนำให้ตั้ง initial-scale=1 |
มี AMP boilerplate code ใน <head> |
เป็นชุด CSS boilerplate เพื่อเอาไว้ซ่อนของที่ AMPJS โหลดออกมา ข้อมูลเพิ่มเติม |
แค่นี้ก็ได้ AMP Page แบบพื้นฐานแล้ว

เข้าใจว่าดูไม่ค่อยสวยเท่าไหร่ แต่เดี๋ยวเราจะมาตกแต่งมันกันต่อ
เข้าใจวิธีการแนบรูปภาพแบบ AMP
ปกติใน HTML เราจะแนบรูปภาพโดยใช้ <img> แต่ใน AMP เราจะใช้ <amp-img> แทน
<amp-img src="https://storage.rayriffy.com/files/image/kaguya.png" alt="Kaguya" width="672" height="420"></amp-img>
<!DOCTYPE html>
<html amp lang="en">
<head>
  <meta charset="utf-8">
  <script async src="https://cdn.ampproject.org/v0.js"></script>
  <title>AMPHTML</title>
  <link rel="canonical" href="https://amp.rayriffy.com">
  <meta name="viewport" content="width=device-width, initial-scale=1.0">
  <style amp-boilerplate>body{-webkit-animation:-amp-start 8s steps(1,end) 0s 1 normal both;-moz-animation:-amp-start 8s steps(1,end) 0s 1 normal both;-ms-animation:-amp-start 8s steps(1,end) 0s 1 normal both;animation:-amp-start 8s steps(1,end) 0s 1 normal both}@-webkit-keyframes -amp-start{from{visibility:hidden}to{visibility:visible}}@-moz-keyframes -amp-start{from{visibility:hidden}to{visibility:visible}}@-ms-keyframes -amp-start{from{visibility:hidden}to{visibility:visible}}@-o-keyframes -amp-start{from{visibility:hidden}to{visibility:visible}}@keyframes -amp-start{from{visibility:hidden}to{visibility:visible}}</style><noscript><style amp-boilerplate>body{-webkit-animation:none;-moz-animation:none;-ms-animation:none;animation:none}</style></noscript>
</head>
<body>
  This is your first AMP page
  <br />
  <amp-img src="https://storage.rayriffy.com/files/image/kaguya.png" alt="Kaguya" width="672" height="420"></amp-img>
</body>
</html>
ผลออกมากก็จะเป็นแบบนี้

ข้อมูลที่ควรอ่านก่อนไปต่อ
ได้เวลาตกแต่งเว็บของเราด้วย CSS แล้ว!!
ได้เริ่มตกแต่งเว็บให้สวยขึ้นซักที งั้นก็เริ่มด้วยหยิบ Font มาจาก Google Fonts
<link rel="stylesheet" href="https://fonts.googleapis.com/css?family=Heebo">
จากนั้นก็มาเขียน CSS โดยเราจะใช้ Tag <style amp-custom> วางไว้ใต้ AMP Boilerplate โดยมีเงื่อนไขว่าทุก CSS ต้องมี inline style แค่อันเดียวและต้องมี embeddedtylesheet แค่อันเดียว
เราก็ตกแต่งไปๆ มาๆ ก็ได้ออกมาแบบนี้
<!DOCTYPE html>
<html amp lang="en">
<head>
  <meta charset="utf-8">
  <script async src="https://cdn.ampproject.org/v0.js"></script>
  <title>AMPHTML</title>
  <link rel="canonical" href="https://amp.rayriffy.com">
  <meta name="viewport" content="width=device-width, initial-scale=1.0">
  <style amp-boilerplate>body{-webkit-animation:-amp-start 8s steps(1,end) 0s 1 normal both;-moz-animation:-amp-start 8s steps(1,end) 0s 1 normal both;-ms-animation:-amp-start 8s steps(1,end) 0s 1 normal both;animation:-amp-start 8s steps(1,end) 0s 1 normal both}@-webkit-keyframes -amp-start{from{visibility:hidden}to{visibility:visible}}@-moz-keyframes -amp-start{from{visibility:hidden}to{visibility:visible}}@-ms-keyframes -amp-start{from{visibility:hidden}to{visibility:visible}}@-o-keyframes -amp-start{from{visibility:hidden}to{visibility:visible}}@keyframes -amp-start{from{visibility:hidden}to{visibility:visible}}</style><noscript><style amp-boilerplate>body{-webkit-animation:none;-moz-animation:none;-ms-animation:none;animation:none}</style></noscript>

  <link rel="stylesheet" href="https://fonts.googleapis.com/css?family=Heebo">
  <style amp-custom>
    html {
      font-family: 'Heebo', sans-serif;
    }
    body {
      background-color: #f5f5f5;
    }
    .container {
      width: 40%;
      margin: 0 auto 0 auto;
    }
  </style>
</head>
<body>
  <div class="container">
    <h2>This is your first AMP page</h2>
    <br />
    <amp-img src="https://storage.rayriffy.com/files/image/kaguya.png" alt="Kaguya" width="3360" height="2100" layout="responsive"></amp-img>
  </div>
</body>
</html>

ง้อวววววววว เริ่มเป็นผู้ดีขึ้นมาแล้ว แต่คราวนี้ไม่ต้องกลัวว่าจะต้องเขียน CSS เกือบทุกอย่าง เพราะบางอันเราสามารถดึง Custom element จาก AMP มาใช้งานได้เลย
การใช้งาน Custom Element
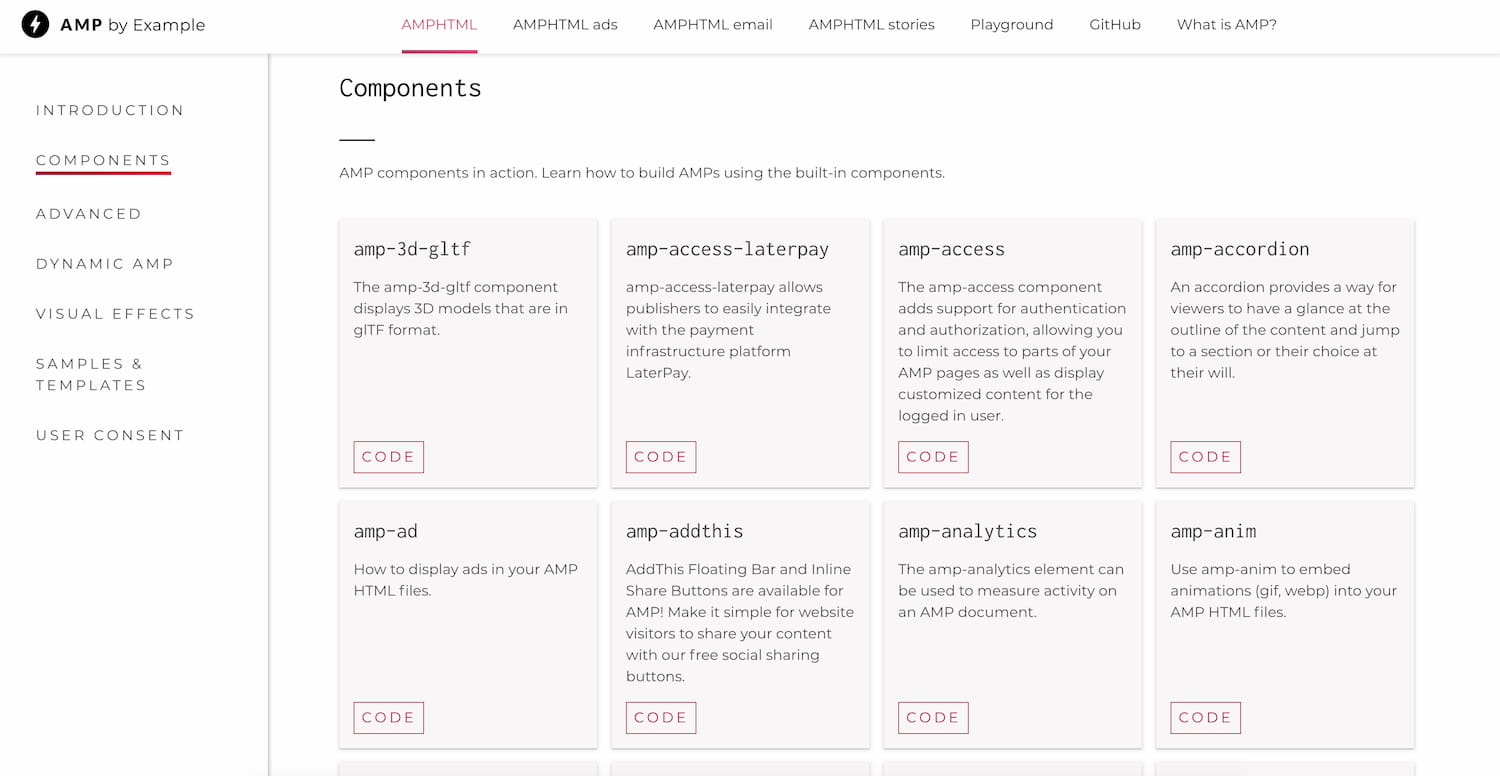
เราก็สามารถหยิบเลือก Custom element ที่อยากใช้ได้ตามใจชอบได้เลยผ่าน AMP By Example โดยเขาก็จะมี Components มาให้เลือกใช้อยู่ วิธีใช้งานเราก็เข้าไปอ่าน Documentation ของ Component นั้นๆ โดยกดไปที่ Code ได้เลย

สมมุติว่าเราอยากจะแนบ Instagram เข้าไปในเว็บ คราวนี้ AMP เค้ามี amp-instagram มาให้แล้วเราก็เริ่มจากการ Import custom element เข้ามาก่อน
<script async custom-element="amp-instagram" src="https://cdn.ampproject.org/v0/amp-instagram-0.1.js"></script>
จากนั้นตามที่อ่าน Docs เค้าก็ให้เราใส่ Custom element เข้าไปตรงๆ ได้เลย
<amp-instagram data-shortcode="Bt2mVrJAFNj"
  data-captioned
  width="1"
  height="1"
  layout="responsive">
</amp-instagram>
กลับมาดูที่ HTML ของเราตอนนี้หน่อย รอบนี้จะขอเอารูปที่แนบไว้ออกไปหน่อย
<!DOCTYPE html>
<html amp lang="en">
<head>
  <meta charset="utf-8">
  <script async src="https://cdn.ampproject.org/v0.js"></script>
  <script async custom-element="amp-instagram" src="https://cdn.ampproject.org/v0/amp-instagram-0.1.js"></script>

  <title>AMPHTML</title>
  <link rel="canonical" href="https://amp.rayriffy.com">
  <meta name="viewport" content="width=device-width, initial-scale=1.0">
  <style amp-boilerplate>body{-webkit-animation:-amp-start 8s steps(1,end) 0s 1 normal both;-moz-animation:-amp-start 8s steps(1,end) 0s 1 normal both;-ms-animation:-amp-start 8s steps(1,end) 0s 1 normal both;animation:-amp-start 8s steps(1,end) 0s 1 normal both}@-webkit-keyframes -amp-start{from{visibility:hidden}to{visibility:visible}}@-moz-keyframes -amp-start{from{visibility:hidden}to{visibility:visible}}@-ms-keyframes -amp-start{from{visibility:hidden}to{visibility:visible}}@-o-keyframes -amp-start{from{visibility:hidden}to{visibility:visible}}@keyframes -amp-start{from{visibility:hidden}to{visibility:visible}}</style><noscript><style amp-boilerplate>body{-webkit-animation:none;-moz-animation:none;-ms-animation:none;animation:none}</style></noscript>

  <link rel="stylesheet" href="https://fonts.googleapis.com/css?family=Heebo">
  <style amp-custom>
    html {
      font-family: 'Heebo', sans-serif;
    }
    body {
      background-color: #f5f5f5;
    }
    .container {
      width: 40%;
      margin: 0 auto 0 auto;
    }
    .instagram-container {
      width: 70%;
      margin: 0 auto 0 auto;
    }
  </style>
</head>
<body>
  <div class="container">
    <h2>This is your first AMP page</h2>
    <br />
    <!-- <amp-img src="https://storage.rayriffy.com/files/image/kaguya.png" alt="Kaguya" width="3360" height="2100" layout="responsive"></amp-img> -->
    <div class="instagram-container">
      <amp-instagram data-shortcode="Bt2mVrJAFNj"
        data-captioned
        width="1"
        height="1"
        layout="responsive">
      </amp-instagram>
    </div>
  </div>
</body>
</html>
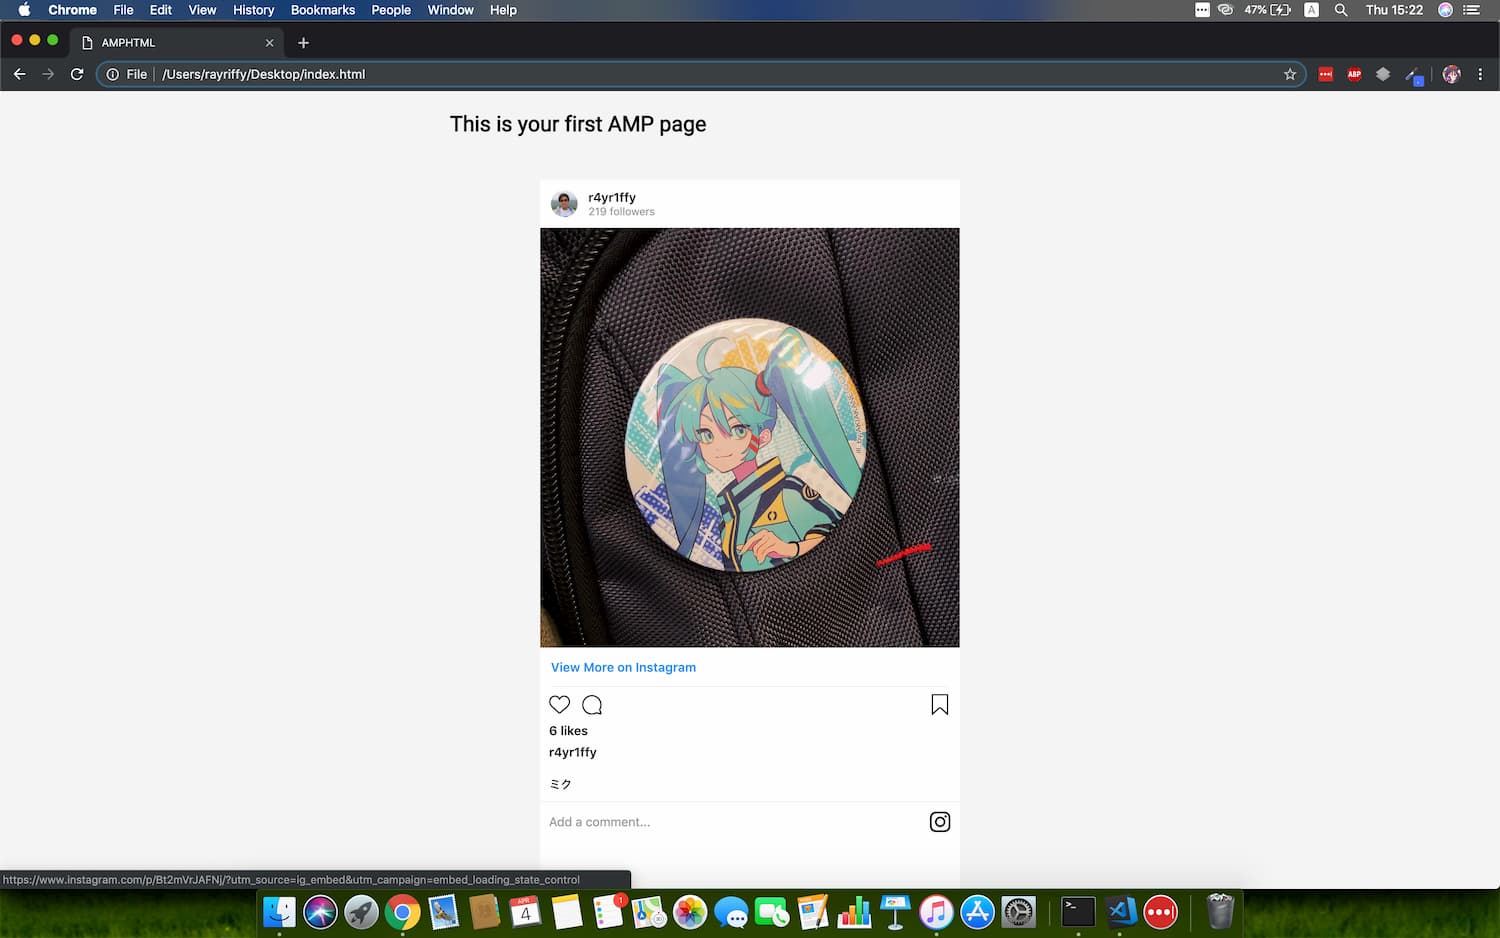
หน้าเว็บที่ออกมาก็จะกลายเป็นแบบนี้

Editor Note
ตอนนี้สามารถเลือกหาดู AMP Components ได้ที่ amp.dev ได้เช่นกันนะครับ อันนี้อ่านง่ายกว่าเยอะ
สรุป
จากที่เขียนไปทั้งหมดก็สามารถสร้างเว็บไซต์โดย based มาจาก AMP HTML ได้แล้วแต่คราวนี้ถ้ายังสนใจของอื่นๆ จาก AMP อีกเค้าก็มี Products อื่นๆ ด้วยเช่น
โดยในแต่ละ Product เนี่ยก็จะมีหลักการประยุกต์ใช้งานที่แตกต่างกันตามการใช้งาน แต่ Concepts เนี่ยจะคล้ายๆ กัน
และสุดท้ายเดี๋ยวผมจะแนบข้อมูลที่จำเป็นไว้ข้างล่าง และก็คลิป Session 'How to use AMP to create your website and What is benefit' จากพี่ตั้งเอาไว้ให้ด้วยเผื่ออยากจะทำความเข้าใจเกี่ยวกับ AMP เพิ่มนะครับ ขอให้สนุกกับการ Dev นะครับ
